Installation guide
Before importing the OpsLogix Oracle Management Pack, please read the license agreement carefully attached in the installation folder.
Prerequisites
- The OpsLogix Oracle Management Pack requires Microsoft System Center Operations Manager 2016 or higher.
- The OpsLogix Oracle Management Pack makes use of Microsoft .NET Framework 4.5. The Microsoft .NET Framework 4.5 must be installed on all pool members (not the Oracle servers) in order to monitor Oracle.
- DO NOT install any ORACLE ODAC components manually on the machine used as the Oracle Monitoring proxy, also called pool member, also known as SCOM management / Gateway Server.The correct ODAC will be installed automatically by the Oracle Management Pack. If there’s already an installed ORACLE ODAC component on the machine, it will conflict with the Oracle Management Pack. In this case, please select a different Oracle monitoring proxy.
Compatibility
The OpsLogix Intelligent Management Pack for Oracle supports the following Oracle versions including any patch update:
Oracle 12c
Oracle 18c
Oracle 19c
Oracle 21c
Oracle 23c
Oracle 26ai
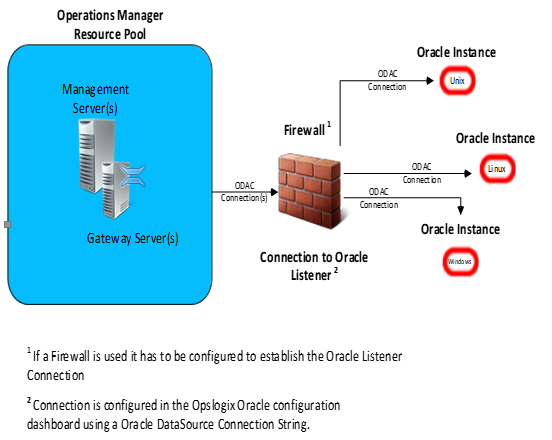
Monitoring Architecture
The OpsLogix Oracle Management Pack is designed to monitor Oracle 12c, 18c, 19c and 21c, 23c, 26ai servers installed on any type of OS platform.
To monitor Oracle servers, the OpsLogix Oracle Management Pack makes use of an Operations Manager Resource Pool. This pool contains one or more management/gateway servers that will act as a monitoring proxy to gather the Oracle monitor data and passing the monitoring information from Oracle servers to Operations Manager. Only a SCOM management server or a SCOM gateway server can be considered a resource pool member. The best scenario for efficient monitoring would be to add two or more members to the resource pool. Doing this will enable you to get failover and load balancing functionalities. In the case of one pool member going down the others will take over and by default, the load will be spread over the available members.
Please note that Operations Manager will install the Oracle ODAC components automatically on all pool members. No manual installations will be needed. If you already have Oracle ODAC components installed, it will conflict with the Oracle Management Pack.
Configuring the Oracle Management Pack
Configuration steps

Importing the Management Packs
Before importing the OpsLogix Oracle Management Pack make sure that you have the following files available:
OpsLogix.BaseLibrary.mp

OpsLogix IMP - Licensing Dashboard v2.x.x.x.mpb

OpsLogix IMP - Oracle Management Pack.mpb

OpsLogix IMP - Oracle Library Management Pack.mpb

OpsLogix IMP - Oracle Management Pack Configuration.mpb

OpsLogix IMP - Oracle Monitor Templates.mpb

OpsLogix IMP - Oracle Collector Management Pack.mpb

OpsLogix.IMP.Oracle.Tasks.mp

OpsLogix IMP - Oracle Reports.mpb

OpsLogix.IMP.Oracle.Dashboards.xml

OpsLogix IMP - Oracle DataGuard Monitoring.mpb (optional)

OpsLogix.IMP.Oracle.Overrides.xm (optional)
*The version number displayed as “x” will change with every release.
To import the OpsLogix Oracle Management Pack complete the following steps:
Navigate to the Administration section of the Operations Manager console:
- Right click Management Packs -> Import Management Packs… -> Add -> Add from Disk
- Browse to the location where you’ve unpacked the OpsLogix Oracle Management Pack.
- Click Open -> Import -> Add From Disk
- Import the .mp , .mpb and .xml Management Pack files from the software package as shown above.
Please note:
After importing the Oracle Management Pack, wait for ± 15 minutes to allow the Management Pack to distribute its components.
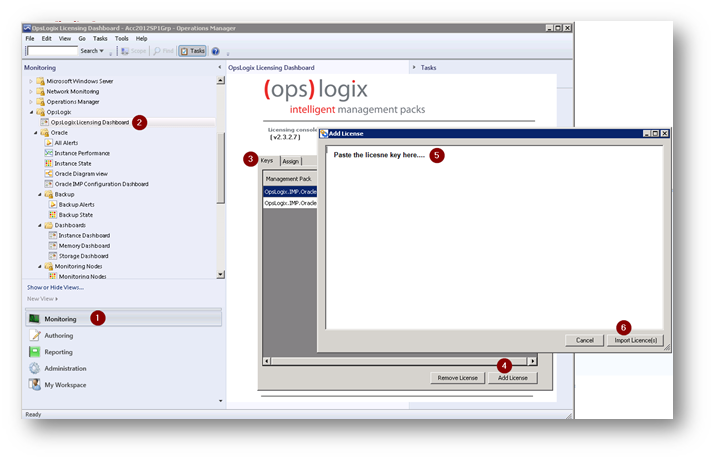
Add Lisence key
- Obtain a valid license key by contacting support@opslogix.com or fill in the contact form on opslogix.com
- Navigate to Monitoring -> OpsLogix -> OpsLogix License Dashboard. See step 1 and 2.
- Click the Add license See step 3 and 4.
- Paste the obtained license key in the Add License Dialog without any preceding or trailing spaces or carriage returns. If you are importing multiple licenses, copy and paste all the licenses sent by OpsLogix (in the license file) without any preceding or trailing spaces or carriage returns. See step 5.
- Click the Import License(s) See step 6.
Add the monitoring Proxy/Pool
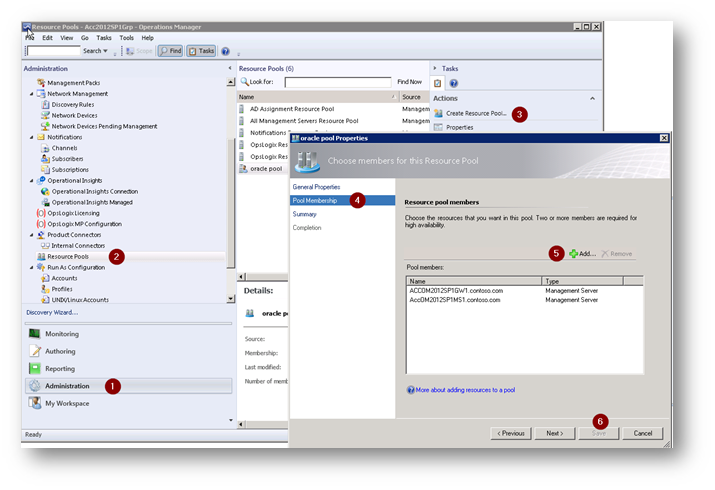
- Login to an Operations Manager Management Server with a user account that has administrator permissions in Operations Manager and open the Operations Console. Then navigate to the Administration pane. See step 1.
- Select the Resource Pools See step 2.
- Now select: Create Resource Pool. See step 3.
- Add the members that you want to act as the Oracle monitoring proxy. See step 4 and 5.
- Save the Resource pool. See step 6.
Setting up the Oracle monitoring account
The OpsLogix Oracle Management Pack requires read permissions on an Oracle database for monitoring. If you do not have a suitable Oracle account/login for monitoring, you can create a monitoring account by using the following Oracle SQL statements. The example below creates an OpsLogix user account for monitoring.
CREATE USER opslogix

IDENTIFIED BY opslogix -- Assign password

DEFAULT TABLESPACE users -- Assign space for table and index segments

TEMPORARY TABLESPACE temp -- Assign sort space

QUOTA UNLIMITED ON users -- Assign unlimited quota

GRANT CREATE SESSION, SELECT ANY DICTIONARY,SELECT ANY TABLE TO opslogix -- Assign privileges
Add the Oracle instance(s)
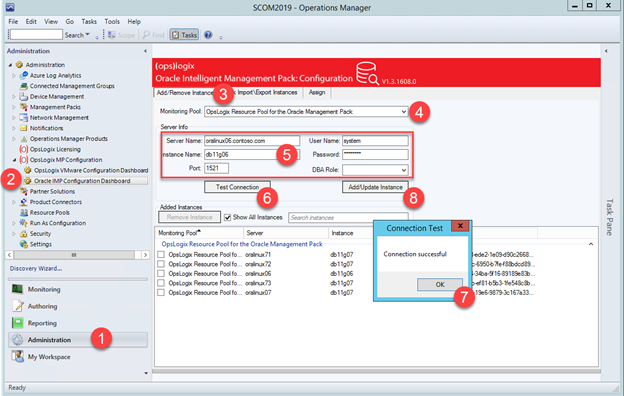
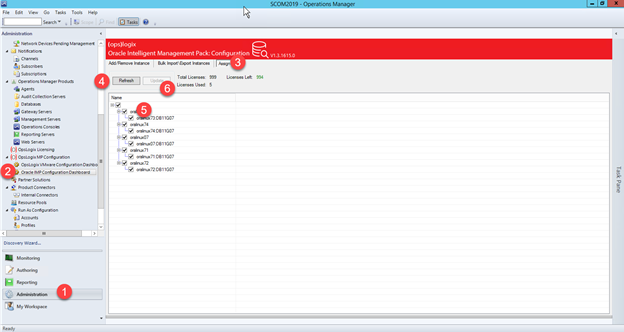
- Navigate to Administration -> OpsLogix MP Configuration -> Oracle IMP Configuration Dashboard and click on the Add/Remove Monitoring Instance See step 1 and 2.
- On the Add/Remove Instance tab select the resource pool from which you would like to monitor an Oracle instance by using the Resource Pool dropdown box. See step 3 and 4.
- Enter the Fully Qualified DNS Name of the Oracle server you would like to monitor in the Server Name Then enter the Oracle instance name in the Instance Name box. In the User Name box enter the monitoring user name (See chapter: Setting up the Oracle monitoring account) and enter the password twice in the password fields. See step 5.
- Select using the “DBA Role” list box the correct privilege role. You can choose “SYSDBA”,
“SYSOPER” or ”SYSDG”. If you want to connect without using special privileges you can leave this field empty.
- Click Test Connection and the connection will be tested using the selected monitoring host. See step 6.
- If the connection test is successful click Add Instance. See step 7 and 8.
Repeat the steps mentioned above for all the Oracle Instances you would like to monitor.
Assign the Oracle Licensing
After we have added a new Oracle Instance to monitor we have to assign a license to it.
- Navigate to Administration -> OpsLogix MP Configuration -> Oracle IMP Configuration Dashboard and click on the Assign See step 1 , 2 and 3.
- Press the Refresh button to load the current assigned licenses. See step 4.
- In the table below select the instances you want to assign a license too. See step 5.
- Click Update to save the selected assignments. See step 6.
Bulk Import\Export Oracle Instances
Sometimes you’ll have to add multiple Oracle instances for monitoring. This can be very time consuming. To save yourself a lot of time and trouble you can also use the Bulk Import\Export option. The Export function will export all existing Oracle connections to an XML file that you have specified. The Import function will to the reverse. Before you can use the import function you will have to follow some steps. First you will have to prepare an import file and as the final step of the process do the importing itself.
Please follow the steps below to create the import file:
- Create a text file with the extension of .XML
- Add the following row below in the text file:
<OracleInstances>
- For every Oracle instance you want to add a new row as shown below. Replace the parameters by the correct values. Keep in mind that the password should be plain text. The Monitoring Pool parameter is the display name of the SCOM resource pool.
<OracleInstance
MonitoringPool="OpsLogix Resource Pool for the Oracle Management Pack"
ServerName="fqdnOfTheServer"
InstanceName="serviceName"
Port="1521" MaxConnections="20"
MinConnections="1"
ConnectionLifeTime="0"
ConnectionTimeOut="600"
Username="monitoruser"
Password="plainPassword"
/>
- When you have added all the Oracle instance rows, as a final step add the row below in the text file:
</OracleInstances>
Save the file to a location on a disk and continue below.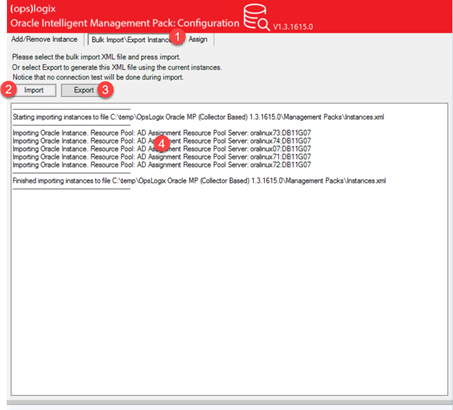
Next use the “Bulk Import\Export Oracle Instances” tab of the Oracle IMP Configuration Dashboard to select the XML file created above.
- Navigate to Administration -> OpsLogix MP Configuration -> Oracle IMP Configuration Dashboard and click on the Bulk Import\Export Instances See Step 1.
- To Import: Press Import and select the .XML file that contains the Oracle instances to add to the monitoring. See step 2 .
- To export, Press Export and select the .XML file were to add all the existing Oracle instances. See step 3
- The logging of the import/export will be shown in the log area. See step 4
Please note that NO connection checks will be performed.
DataGuard configuration
If you are using DataGuard monitoring, then first import the DataGuard Management Pack. When you have done that, follow the steps as described in the ADD THE ORACLE INSTANCE(S) paragraph. Except this time, you will have to add the DG (primary and standby) instances by selecting the DBA Role to “SYSDBA” or “SYSDG”. This is an important step since this privilege is needed to be able to monitor standby instances.
Alert log monitoring
To enable Oracle Alert log monitoring you must first enable the rule using an override. To do this, use the Operations Manager Console search for the rule “Alert Log Messages Monitoring” for Oracle version 11g or above or “10g Alert Log Messages Monitoring” for Oracle 10g.
Create an enable override for the Oracle instances that you want to apply this alert reporting rule on. You can also change the messages that the rule detects by using the override property “QueryForInLog” with the correct “where sql” statement. The default query is: “message_text like 'ORA-%'”.
For example when you want to add monitoring for an Oracle log message that contains the word “immediate” you will have to override this parameter with: ( (message_text like 'ORA-%') OR (message_text like 'immediate%') ) .
Only for Oracle 11g or above
Before you can enable Oracle alert log monitoring, you must create a view as described below. This view will be used to receive the Oracle alert log messages and create a SCOM alert for each Oracle log record found:
create view alertlog as select * from sys.x$dbgalertext;

grant select on sys.alertlog to <oracle monitoring user>;
Replace the <oracle monitoring user> with the correct account that you are using to monitor the Oracle instances.
Test case:
You can test if the alert messages are collected by executing the statement below on the Oracle instance that you have enabled and configured the alert log monitoring for.
- Open sqlplus and connect to the instance
- Login as SYSDBA and execute:
exec dbms_system.ksdwrt(2, 'ORA-00000 Test Event');
Within a few minutes an alert should appear in the SCOM console as shown below:
