Configuration the VMWare Management Pack
The steps below show the process of configuring the OpsLogix VMware Management Pack in your SCOM environment.

Importing the Management Pack
Before importing the OpsLogix VMware Management Pack make sure that the following files are available:
OpsLogix.BaseLibrary.mp
Contains the root folders in the SCOM console
OpsLogix IMP – Licensing Dashboard Vx.x.x.x.mpb
Contains the generic licensing dashboard
OpsLogix IMP – VMware Base Management Pack.mpb
Contains the discovery of the VMware components
OpsLogix IMP – VMware Monitoring Management Pack.mpb
Contains the monitoring of the VMware components
OpsLogix IMP – VMware Hardware Management Pack.mpb
Contains the discovery and monitoring of physical hardware components
OpsLogix IMP – VMware Templates Management Pack.mpb
Contains the Alert templates to map / add custom vCenter alert monitors
OpsLogix IMP – VMware Dashboards Management Pack.mpb
Contains the various dashboards
OpsLogix IMP – VMware Reporting Management Pack.mpb
Contains the special VMware reports
OpsLogix IMP – VMWare Monitoring Groups Management Pack.mpb
Contains the group definition for more addon counter collection
OpsLogix IMP – VMWare Collector Management Pack.mpb
Contains the special OpsLogix VMware collector
OpsLogix IMP – Generic Reports Management Pack.mpb
Contains the Top10 and Matrix reports
OpsLogix IMP – VMware Configuration Dashboard Management Pack
Contains the VMware configuration dashboard
Optional:
OpsLogix IMP – VMware AddOn vCenter Alert Monitoring Management Pack.mpb
Contains vCenter default alerts to be mapped to SCOM monitors
OpsLogix IMP – VMware Capacity Analysis Management Pack
Contains cluster (over)commitment monitoring
OpsLogix IMP – VMware Guest Monitoring Management Pack
Contains Virtual machine Guest OS state and Disk usage monitoring
Note: The version number displayed as “V.x.x.x.x” will change through every release or may not be listed.
To import the OpsLogix VMware Management Pack complete the following steps:
1. Navigate to the Administration section of the Operations Manager Console
2. Right click Management Packs -> Import Management Packs… -> Add -> Add from Disk
3. Browse to the location where you unpacked the OpsLogix VMWare Management Pack
4. Click Open -> Import -> Add from Disk
5. Import the .mp , .mpb or .xml Management Pack files from the software package as shown above.
Note: After importing the VMware Management Pack, depending on your SCOM environment, it takes about 15 minutes (or considerably longer if your SCOM environment is under heavy load) for all the components to deploy.
Adding the license key
Please see the KB article below to import the license key:
https://www.opslogix.com/knowledgebase/importing-the-opslogix-vmware-mp-license-key
Add the Monitoring Pool
A resource pool enables the VMware Management Pack to offer high availability monitoring when using more than one System Center Operations Manager Management Server. The VMware MP provides a resource pool called “OpsLogix Resource Pool for VMware Management Pack” that contains all Management Servers by default. You can change the members or create a new resource pool by following the procedures in the next chapter.
Using SCOM Gateways as pool member is supported but currently has a discovery limit of ~2000 virtualmachines. This is due to the SCOM 4MB batch size limitation. A supported workaround could be using the connection split feature.
Change the members of the Resource Pool
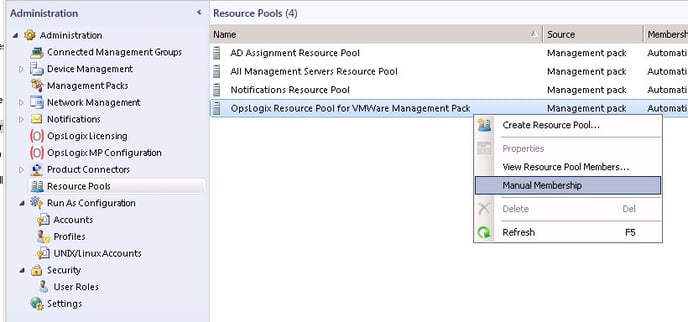
To change the members of the resource pool “OpsLogix Resource Pool for VMware Management Pack” follow the steps below
- In the Administration section of the SCOM console navigate to Administration -> Resource Pools and right click OpsLogix Resource Pool for VMWare Management Pack. Select Manual Membership.
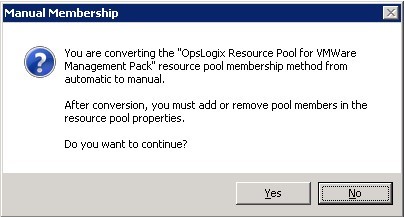
- Click Yes on the Manual Membership popup box.
- Add or remove the Management Servers on which you would like the Management Pack to be able to run. Note: All Management Servers in the OpsLogix Resource Pool for VMWare Management Pack must be able to connect to the vCenter server in your VMware environment for the management pack to function correctly.
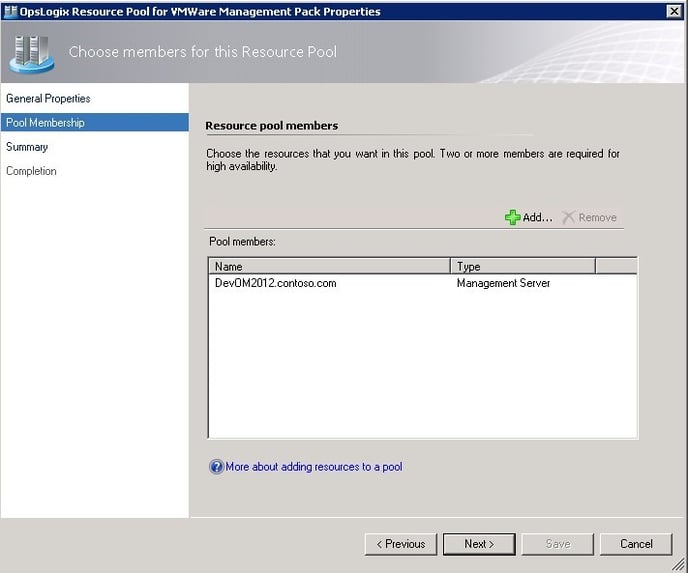
- Complete the OpsLogix Resource Pool for VMWare Management Pack Properties
Note: If you add new members to a resource pool that was already monitoring a VMware connection you will have to do a “Check Connection” again to automatically deploy the OpsLogix Collector.
Creating a new Resource Pool
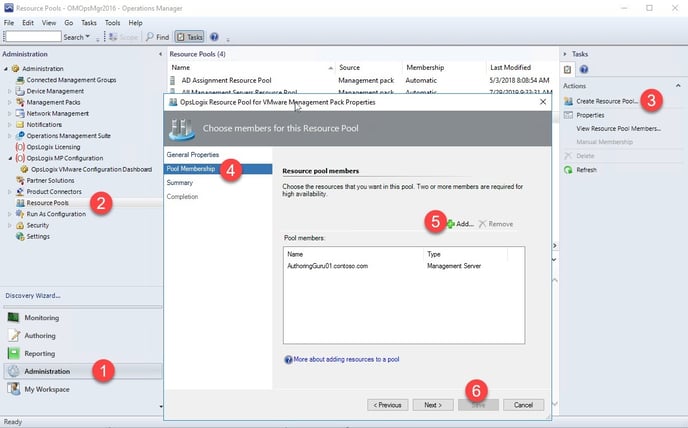
To create a new custom resource pool, follow the steps below.
- Login to an Operations Manager Management Server with a user account that has administrator permissions in Operations Manager and open the Operations Console and navigate to the Administrator Pane. See Step 1 in the picture.
- Select the Resource Pools See Step 2 in the picture.
- Now select: Create a new Resource Pool. See Step 3 in the picture.
- Add the members that you want to let act as the VMware monitoring proxy. See Step 4, 5 in the picture.
- Save the resource pool. See step 6 in the picture.
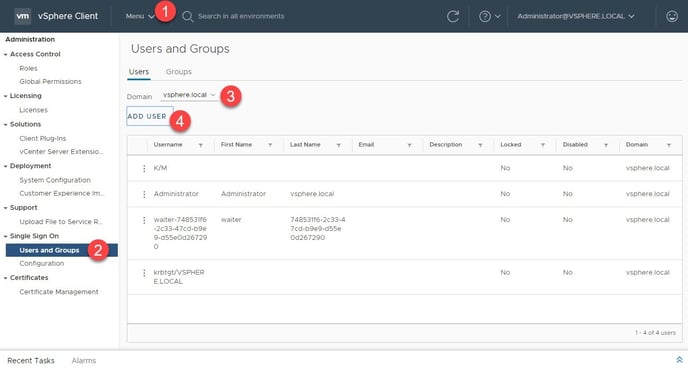
Setting up the VMware Monitoring Account
The OpsLogix VMware Management Pack requires Top level read-only permissions on vCenter or ESX(i) host(s) for monitoring to work correctly. If you do not have a suitable VMware account/login for monitoring, you can create a monitoring account by using the steps below. The example below configures the user OpsLogixMonitoring for the VMware monitoring.
Note: The steps below do not apply for monitoring a direct attached ESX(i) host without VCenter. In case of a direct attached host you must use the vSphere Client to configure the appropriate permissions. For more information see: http://kb.VMWare.com/selfservice/microsites/search.do?language=en_US&cmd=displayKC&externalId=2082641
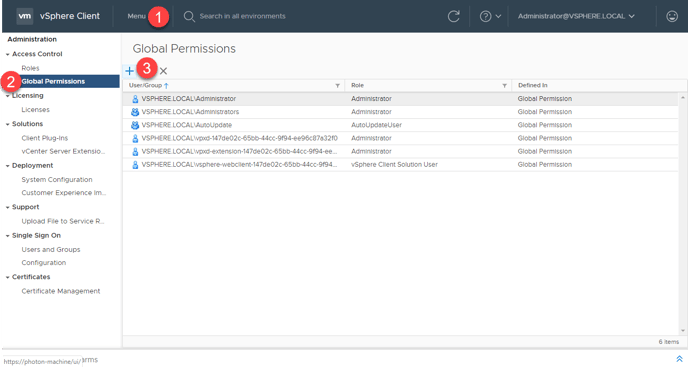
Navigate to “Menu -> Administration-> User and Groups”. (see step 1 and 2 in the picture below) Select the correct domain and create the new user ‘OpsLogixMonitoring’. (see step 3 and 4 in the picture below.)
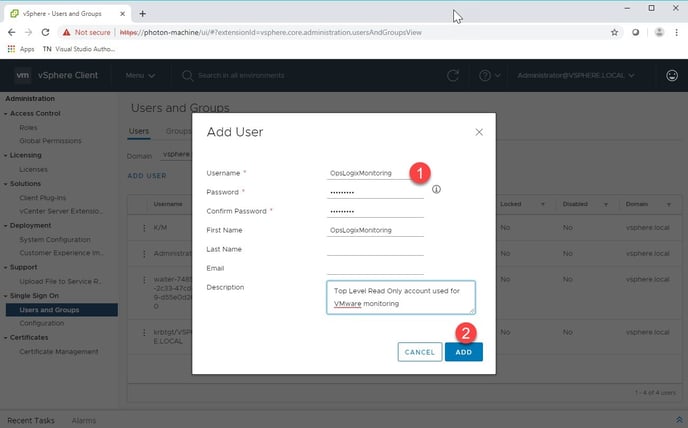
Apply the user information for the user ‘OpsLogixMonitoring’ and press add (see step 1 and 2 in the picture below).
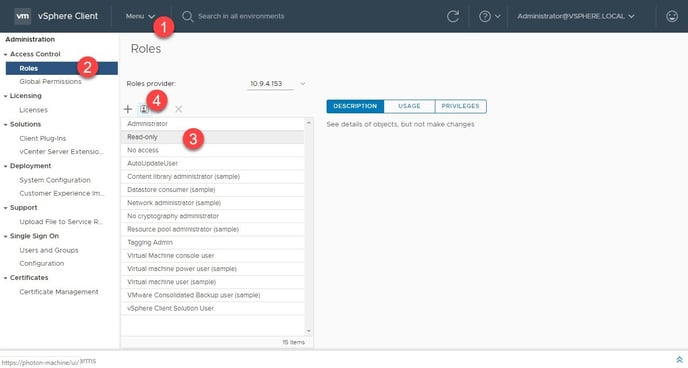
Navigate to “Menu -> Administration-> Roles” and create a clone of the Read-only access role (See step 1, 2, 3 and 4 in the picture below).
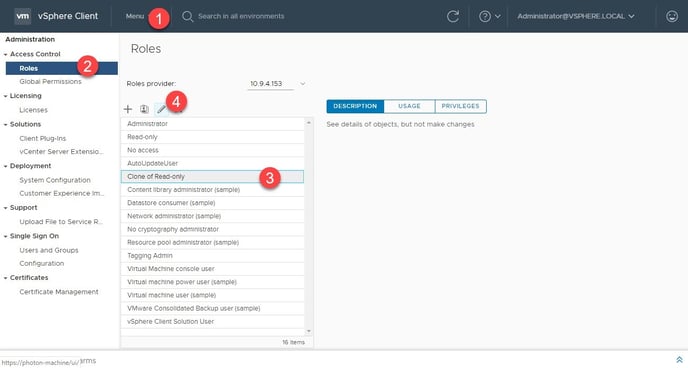
Apply a role name and create the special role. (See step 1, 2 in the picture below).

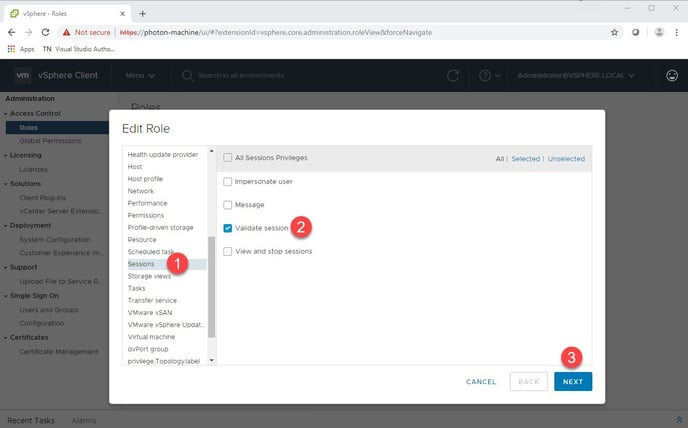
Click on the newly created read-only clone and then click Edit. (See step 1, 2, 3 and 4 in the picture below).
Next, select the “Validate session” privilege and save change made. (See step 1, 2 and 3 in the picture below)
Navigate to “Menu -> Administration-> Roles” to add the new created user. (See step 1, 2 and 3 in the picture below)
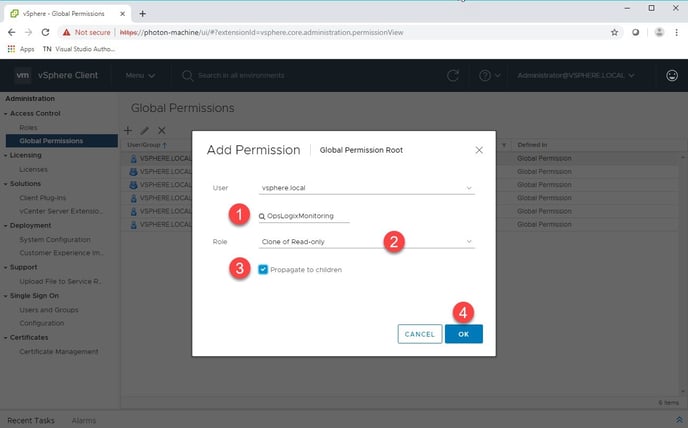
Select the just created user and select the just created special role. (See step 1, 2 in the picture below). Enable ‘Propogate to childeren’ to give Toplevel access and save it. (See step 3, 4 in the picture below)
Add the vCEnter or ESXi Connection(s)
To start monitoring your VMWare environment you need to add a connection to the vCenter or ESX(i) host. Once you have successfully added a connection, SCOM will start discovering and monitoring your VMware environment. The steps to add a connection are shown below.
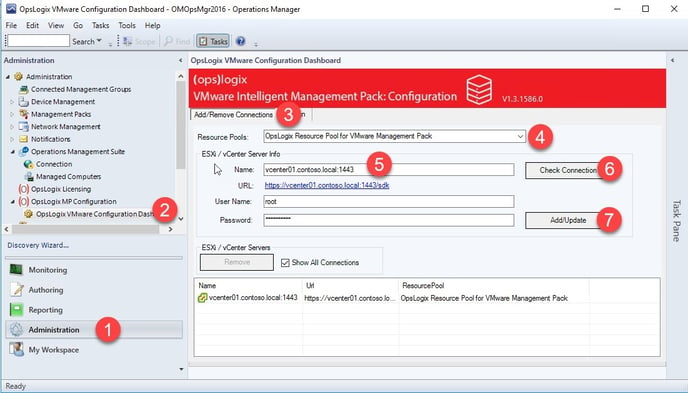
- Navigate to Administration -> OpsLogix MP Configuration -> VMware IMP Configuration Dashboard and click the Add/Remove Monitoring Instance See step 1 and 2 in the picture.
- On the Add/Remove Connections tab select the resource pool from which you would like to monitor the VMware environment by using the Resource Pool dropdown box. See step 3 and 4 in the picture.
Note: If you are unsure what resource pool to use, leave this value on the default.
- Enter the Fully Qualified DNS Name or IP address of the vCenter server or ESX(i) Host you would like to monitor in the Name In the Username textbox enter the monitoring user name (See chapter: Setting up the VMware monitoring account) and enter the password in the Password field. See step 5 in the picture.
- Click Check Connection and the OpsLogix collector will we installed on all the members of the resource pool you selected, after this the connection will be tested using one of the members of the selected resource pool. See step 6 in the picture.
- If the connection test is successful click Add/Update. See step 7 in the picture.
Repeat these steps for all the VMware vCenter or ESX(i) hosts you would like to monitor.
Assigning a license to the hosts
After you have added the vCenter/Host connection you need to assign a license to every ESX host. You can do this in the assign tab. Only the assigned hosts will be monitored and discovered in SCOM.
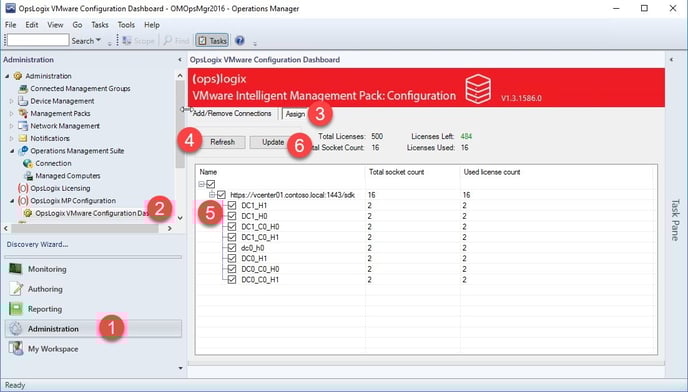
Follow the steps below:
- Navigate to Administration -> OpsLogix MP Configuration -> VMware IMP Configuration Dashboard and click the Assign See step 1, 2 and 3 in the picture.
- If the host view is empty, click Refresh and wait for the hosts to become visible. See step 4 in the picture.
- Select the hosts you want to license. See step 5 in the picture.
- Click Update to save the hosts you have assigned a license. See step 6 in the picture.